
IPカメラの設置には、最適な設置場所の決定、接続性の問題の解決、複雑な設定プロセスのナビゲートなど、いくつかの課題があります。多くのユーザがこのような面で苦労しており、セキュリティ範囲を損なう可能性があります。しかし、IPカメラシステムが期待通りの包括的な保護とパフォーマンスを提供するためには、適切な設置が極めて重要です。カメラが戦略的に配置され、正しく設定されていれば、死角や技術的な問題を最小限に抑えながら、監視範囲と鮮明度の両方を最大化する効果的なセキュリティ境界が形成されます。
ニーズに合ったIPカメラを選ぶには?
適切なものを選んだら IPカメラ 最適なパフォーマンスを得るためには、適切な設置が不可欠です。私は数え切れないほどの設置工事を手がけてきましたが、信頼できるのは、計画的なアプローチがすべての違いを生むということです!
まず、セキュリティ要件に基づいて理想的な設置場所を決めます。周囲を保護する場合は、カメラを8~10フィートの高さに設置し、侵入口までの見通しを確保します。屋内に設置する場合は、通常、隅に設置するのが最も効果的です。周囲の照明は画質に大きく影響するため、明るい光源に直接カメラを向けないようにしてください。
ケーブル配線には慎重な計画が必要です。イーサネットケーブルを配線する場合は、シグナルブースターなしで100mを超えないようにしてください。屋外に設置する場合は、必ず耐候性のケーブルと保護コンジットを使用してください。多くの専門インストーラーが JERテック 将来の調整を容易にするため、各カメラ位置にケーブルの余分なサービスループを残すことを推奨します。
| カメラタイプ | 理想的な取り付け高さ | 典型的な視野 |
|---|---|---|
| 弾丸カメラ | 8~10フィート | 70°-90° |
| ドームカメラ | 7~9フィート | 90°-120° |
| PTZカメラ | 10~12フィート | 360°回転 |
取り付け後の適切な角度調整をお見逃しなく-わずかな微調整でも、カバー範囲は劇的に向上します。個別の設置指導が必要ですか? セキュリティ・スペシャリストへのお問い合わせ お客様の物件のレイアウトに合わせた専門的なアドバイスをご提供いたします。

設置前に必要な道具と計画
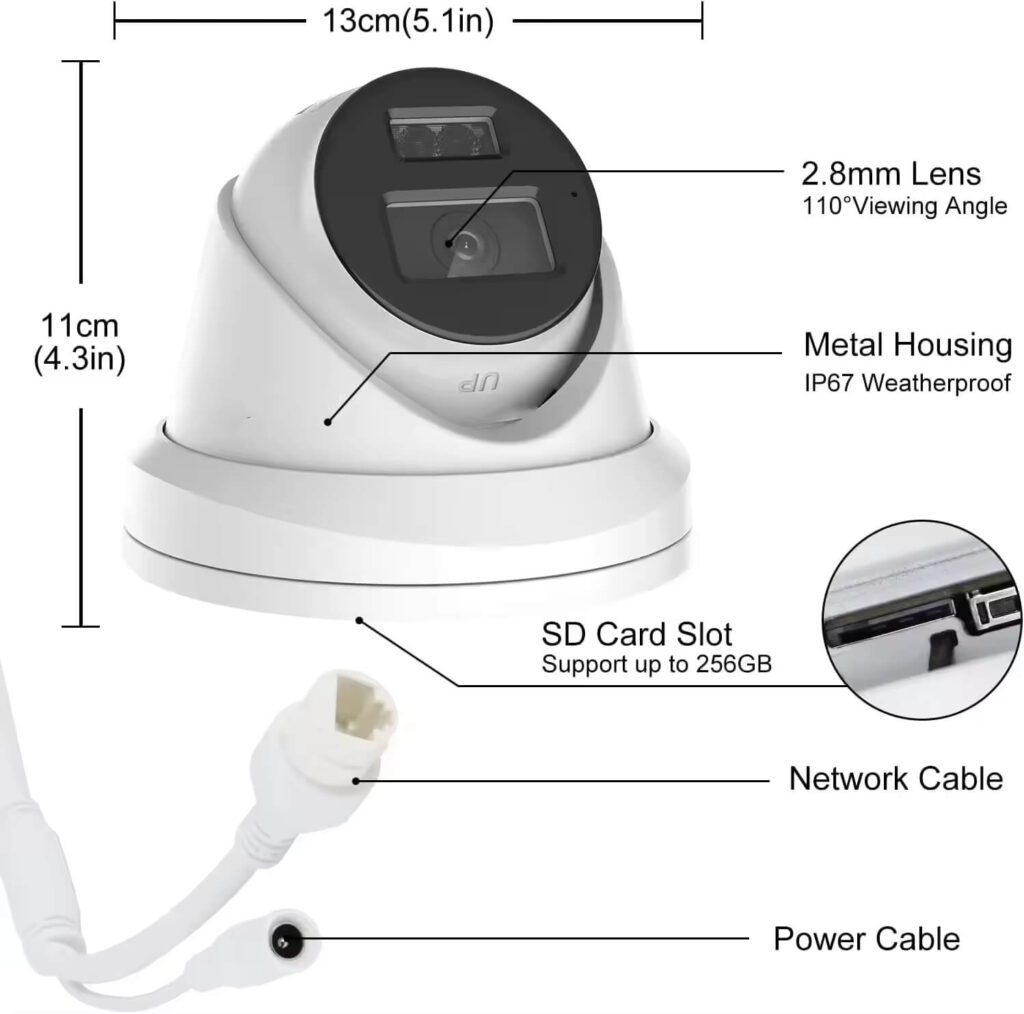
私は長年の経験を通じて、準備することは戦いの半分であることを学んだ。 防犯カメラ 設置する。ハシゴに登る前に、入念に組み立てられたツールキットが必要だ。最低限、これらの必需品を集めよう:さまざまな表面に対応するさまざまなビットを備えた信頼性の高い電動ドリル、ケーブルクリンパーとネットワークケーブルテスター、壁をナビゲートするためのフィッシュテープ、電圧検出器。
道具だけでなく、適切な計画を立てることで数え切れないほどの頭痛の種を防ぐことができる。私は常に徹底的な敷地調査から始め、顧客と一緒に敷地を歩いて脆弱な場所を特定する。敷地のレイアウトをスケッチし、最適なカメラ位置をマークして死角をなくします。
| プランニング・エレメント | 重要な検討事項 |
|---|---|
| ネットワーク評価 | 1080pカメラ1台あたり2~4Mbpsの帯域幅 |
| 電力計画 | 標準コンセントとPoE機能の比較 |
| 表面評価 | レンガ/コンクリート用アンカー、乾式壁補強材 |
ネットワーク能力を過小評価しないでください。帯域幅不足のために多くのシステムが苦労しているのを見てきました。多くのシステムで JERテック大規模な設置には専用ネットワークをお勧めします。具体的なセットアップに必要なものについてご質問がありますか? チームへのお問い合わせ 最初の穴を開ける前に、個人的な評価をお求めください!
IPカメラの適切な取り付けと位置決め方法とは?
道具をそろえたところで、取り付けと位置決めに取りかかりましょう。ちょっとした調整でも、カバレージの質は大きく変わります。私は何百台ものシステムを設置してきましたが、高さ位置は常に重要です。8~10フィートのスイートスポットは、いたずら防止と細部の捕捉のバランスが完璧です。
エントランス(最も重要なエリア)では、私は常にカメラの角度を約30度下げ、頭頂部だけでなく顔を撮影するようにしています。この簡単な調整を見逃しているDIY設置がいかに多いことか!
| ロケーションタイプ | 最適な角度 | 主な検討事項 |
|---|---|---|
| エントランス | 下向き30 | 顔撮影優先 |
| 車道 | 下向き15~20 | ナンバープレートの視認性 |
| 広い地域 | 最小限の傾斜 | 最大カバーエリア |
ケーブルマネジメントは美観だけではありません。それはシステムの寿命に関わることなのです。 JERテック私たちは、すべての屋外配線に耐候性コンジットを使用し、4~5フィートごとにケーブルを固定しています。天候にさらされる接続部には、マリングレードのシリコンシーラントを塗布しています。複雑な取り付け状況に苦労していたり、最適なカメラアングルが不明だったりしますか? インストレーション・チーム を参照されたい!
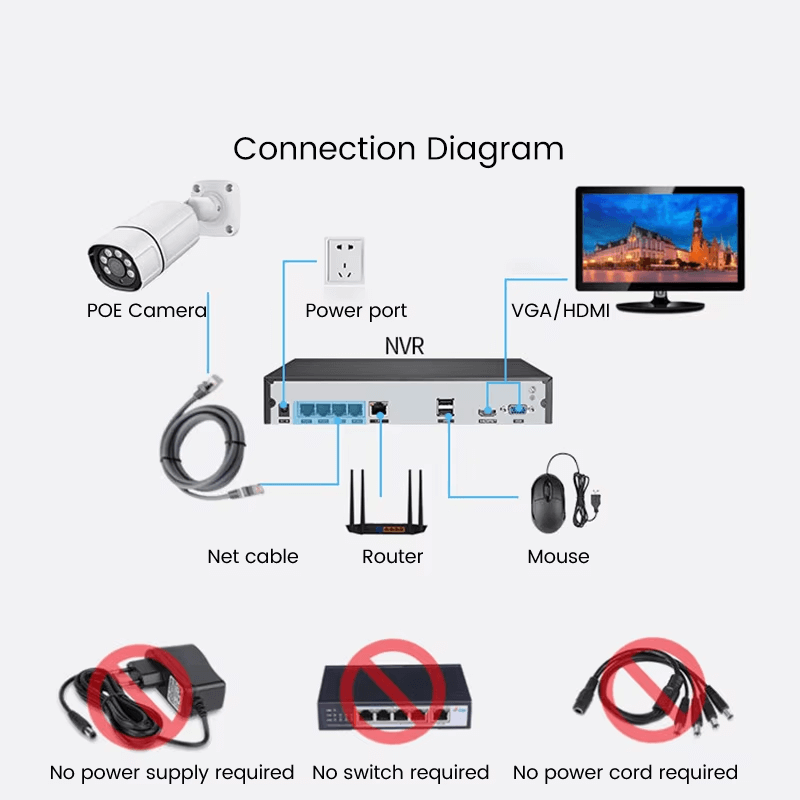
IPカメラシステムの最適な接続・設定方法とは?
カメラが正しく取り付けられたら、次は接続と設定のプロセスです。PoE(パワー・オーバー・イーサネット)接続は、ほとんどの設置において最も信頼性の高いソリューションです。カメラを カメラをPoE 電気工事士は必要ありません!
ワイヤレスセットアップの場合、理論上の範囲を信用してはいけません。私は常設する前に、各カメラの設置場所で必ず信号強度テストを行います。すべてを取り付けた後にWi-Fiが弱いことを発見するほどイライラすることはない!
| 接続タイプ | メリット | 制限事項 |
|---|---|---|
| PoE | 信頼性の高いシングルケーブル・ソリューション | 最大距離328フィート |
| Wi-Fi | ケーブル配線不要 | 信号干渉のリスク |
| P2P | ポート転送不要 | メーカーのサーバーに依存 |
統計的に割り当てる IPアドレス この小さな一歩が、将来の接続にまつわる無数の頭痛の種を防ぎます。リモートビューイング機能については JERテック 特に家庭用システムの場合は、複雑なポート転送ではなく、メーカーのP2Pサービスを利用することを強くお勧めします。まだネットワーク設定に悩んでいますか? 技術者 を遠隔操作でご案内いたします!
IPカメラ設置に関するよくある問題のトラブルシューティングは?
完璧なプランニングと設置があったとしてもだ、 IPカメラシステム 時折、問題が発生する。私が JERテックしかし、ほとんどの問題は、簡単に解決できる予測可能なカテゴリーに分類されることに気づいた。
接続性のトラブルについては、物理的な接続をチェックするという最もシンプルな解決策から始めます。ケーブルの断線が原因であることが驚くほど多いのです!次に、Advanced IP Scannerのような無料ツールを使ってクイック・ネットワーク・スキャンを実行し、カメラに有効なIPアドレスがあることを確認します。アドレスがない?カメラのピンホールボタンを使ってファクトリーリセットを試してください。
| 問題の種類 | 一般的な原因 | 最初のトラブルシューティング |
|---|---|---|
| ビデオフィードなし | 電源/ネットワークの問題 | 電源の確認、ケーブルのチェック |
| 画質が悪い | フォーカス/汚れ/設定 | レンズのクリーニング、フォーカスのチェック、設定の調整 |
| 誤動作警告 | 感度が高すぎる | 立ち入り禁止区域を作り、感度を下げる |
夜間の画像がぼやける?まず、レンズを清掃し(恥ずかしくなるほど簡単ですが、効果的です)、次にIR照明の設定を確認してください。過剰なモーションアラートは、通常、感度設定の調整が必要であることを示しています。個別のトラブルシューティングが必要ですか? サポートチームへのお問い合わせ リモート診断ヘルプ
結論
成功裏に IPカメラの設置 そのためには、適切な機器の思慮深い選択、綿密な計画と準備、戦略的な設置と配置、適切なネットワーク設定、トラブルシューティングの知識が必要です。これらのガイドラインに従うことで、信頼性の高い セキュリティシステム 死角や技術的な問題を最小限に抑えながら、包括的なカバレッジを提供します。適切な設置は、セキュリティの強化、メンテナンス問題の軽減、安心感という利益をもたらす投資であることを忘れないでください。ご自宅、ビジネス、財産のいずれを保護する場合でも、適切に実行されたIP カメラ設置で強固なセキュリティを実現 脅威を効果的に抑止すると同時に、必要なときには貴重な資料を提供する。
