

Installing IP cameras can present several challenges, including determining the optimal placement, resolving connectivity issues, and navigating complex configuration processes. Many users struggle with these aspects, which can potentially compromise their security coverage. However, proper installation is crucial for ensuring your IP camera system provides the comprehensive protection and performance you expect. When cameras are strategically positioned and correctly configured, they create an effective security perimeter that maximizes both coverage and clarity while minimizing blind spots and technical difficulties.
Choosing the Right IP Camera for Your Needs?
Once you’ve selected the right IP camera for your security needs, proper installation becomes crucial for optimal performance. I’ve handled countless installations, and trust me—a methodical approach makes all the difference!
First, determine the ideal mounting location based on your security requirements. For perimeter protection, position cameras 8-10 feet high with clear sightlines to entry points. Indoor installations typically work best in corners for maximum coverage. Remember that ambient lighting significantly impacts image quality—avoid pointing cameras directly at bright light sources.
Cabling demands careful planning. If running Ethernet cables, ensure they don’t exceed 328 feet (100m) without signal boosters. For outdoor installations, always use weather-rated cables and protective conduits. Many professional installers at JER-Tech recommend leaving an extra service loop of cable at each camera location to facilitate future adjustments.
| Camera Type | Ideal Mounting Height | Typical Field of View |
|---|---|---|
| Bullet Camera | 8-10 feet | 70°-90° |
| Dome Camera | 7-9 feet | 90°-120° |
| PTZ Camera | 10-12 feet | 360° rotation |
Don’t overlook proper angle adjustment after mounting—even slight tweaks can dramatically improve coverage. Need personalized installation guidance? Contact our security specialists for expert advice tailored to your specific property layout.

What Tools and Planning Are Required Before Installation?
I’ve learned through years of experience that preparation is half the battle with security camera installations. Before climbing any ladder, you’ll need a thoughtfully assembled toolkit. At minimum, gather these essentials: a reliable power drill with various bits for different surfaces, a cable crimper and network cable tester, fish tape for navigating walls, and a voltage detector.
Beyond tools, proper planning prevents countless headaches. I always start with a thorough site survey, walking the property with clients to identify vulnerable areas. Next comes the coverage mapping phase—sketch your property layout and mark optimal camera positions to eliminate blind spots.
| Planning Element | Critical Considerations |
|---|---|
| Network Assessment | 2-4Mbps bandwidth per 1080p camera |
| Power Planning | Standard outlet vs. PoE capability |
| Surface Evaluation | Masonry anchors for brick/concrete; reinforcement for drywall |
Don’t underestimate your network capability—I’ve seen many systems struggle due to insufficient bandwidth. At JER-Tech, we recommend dedicated networks for larger installations. Have questions about what you’ll need for your specific setup? Contact our team for a personalized assessment before you drill that first hole!
How Do You Properly Mount and Position IP Cameras?
Now that we’ve gathered our tools, let’s tackle mounting and positioning—where even small adjustments make enormous differences in coverage quality. I’ve installed hundreds of systems, and height placement is consistently crucial. The 8-10 foot sweet spot offers the perfect balance between tamper resistance and detail capture.
For entrances (the most critical areas), I always angle cameras down at approximately 30 degrees to capture faces rather than just the tops of heads. You’d be surprised how many DIY installations miss this simple adjustment!
| Location Type | Optimal Angle | Key Consideration |
|---|---|---|
| Entrances | 30° downward | Face capture priority |
| Driveways | 15-20° downward | License plate visibility |
| Wide Areas | Minimal tilt | Maximum coverage area |
Cable management isn’t just about aesthetics—it’s about system longevity. At JER-Tech, we insist on weatherproof conduit for all outdoor runs, securing cables every 4-5 feet. For weather-exposed connections, I apply marine-grade silicone sealant—a small investment that prevents costly water damage. Struggling with complex mounting situations or unclear about optimal camera angles? Reach out to our installation team for site-specific recommendations!
What’s the Best Way to Connect and Configure Your IP Camera System?
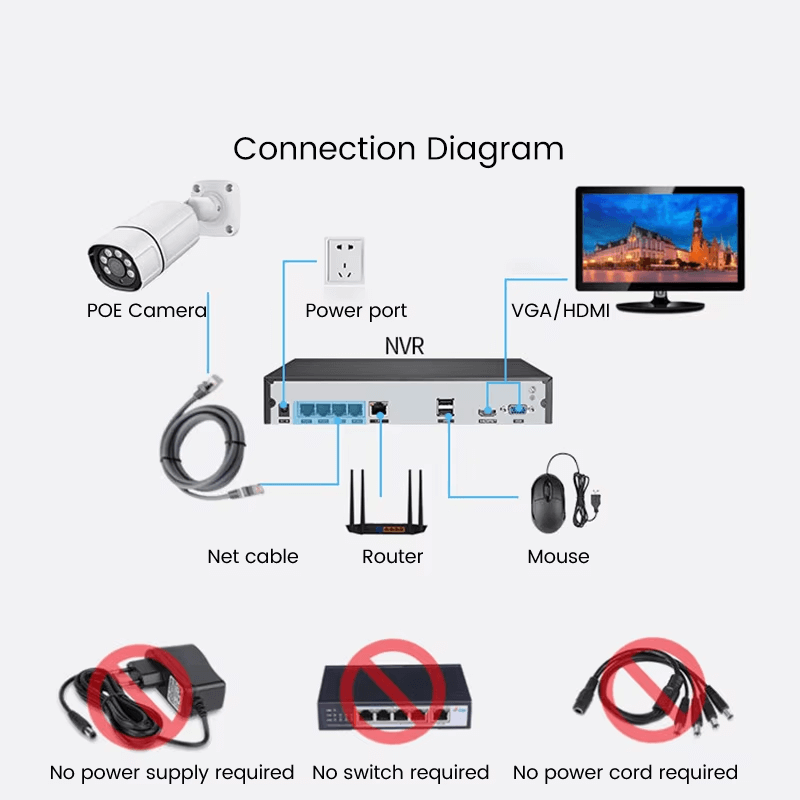
With your cameras properly mounted, it’s time to tackle the connection and configuration process. I’ve found that PoE (Power over Ethernet) connectivity offers the most reliable solution for most installations. Simply connect your cameras to a PoE switch, and you’ve handled both power and data needs with a single cable—no electrician required!
For wireless setups, don’t trust the theoretical range claims. I always perform a signal strength test at each camera location before permanent installation. Nothing’s more frustrating than discovering weak Wi-Fi after mounting everything!
| Connection Type | Advantages | Limitations |
|---|---|---|
| PoE | Single-cable solution, reliable | 328ft max distance |
| Wi-Fi | No cabling needed | Signal interference risks |
| P2P | No port forwarding required | Reliant on manufacturer servers |
Statistically assign IP addresses to each camera—this small step prevents countless future connectivity headaches. For remote viewing capability, the experts at JER-Tech strongly recommend using the manufacturer’s P2P service rather than complicated port forwarding, especially for residential systems. Still struggling with network configuration? Our technicians can remotely guide you through the process!
How Can You Troubleshoot Common IP Camera Installation Problems?
Even with perfect planning and installation, IP camera systems occasionally develop issues. In my years at JER-Tech, I’ve noticed that most problems fall into predictable categories with straightforward fixes.
For connectivity troubles, I start with the simplest solution: checking physical connections. You’d be surprised how often a disconnected cable is the culprit! Next, I run a quick network scan using free tools like Advanced IP Scanner to confirm the camera has a valid IP address. No address? Try a factory reset using the camera’s pinhole button.
| Problem Type | Common Causes | First Troubleshooting Steps |
|---|---|---|
| No Video Feed | Power/network issues | Verify power source, check cables |
| Poor Image Quality | Focus/dirt/settings | Clean lens, check focus, adjust settings |
| False Motion Alerts | Sensitivity too high | Create exclusion zones, reduce sensitivity |
Blurry nighttime images? First, clean the lens (embarrassingly simple but effective), then check your IR illumination settings. Excessive motion alerts usually indicate sensitivity settings need adjustment—create exclusion zones for areas with moving trees or traffic. Need personalized troubleshooting assistance? Contact our support team for remote diagnostic help!
Conclusions
Successfully installing IP cameras requires thoughtful selection of appropriate equipment, thorough planning and preparation, strategic mounting and positioning, proper network configuration, and troubleshooting knowledge. By following these guidelines, you can create a reliable security system that provides comprehensive coverage while minimizing blind spots and technical difficulties. Remember that proper installation is an investment that pays dividends through enhanced security, reduced maintenance issues, and peace of mind. Whether protecting your home, business, or property, a well-executed IP camera installation creates a robust security perimeter that effectively deters threats while providing valuable documentation when needed.
