
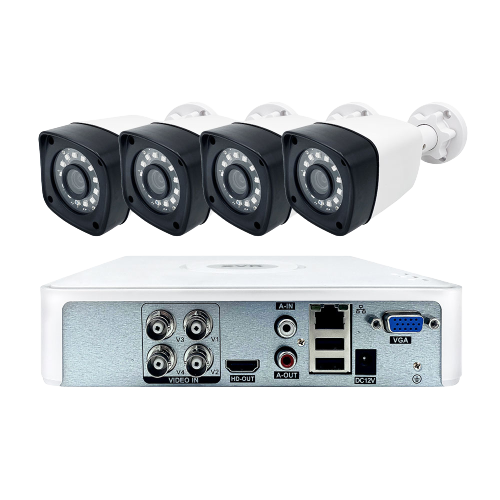
Setting up a DVR for analog cameras might seem tricky at first. However, with the right steps and proper guidance, you can create a reliable security system. Many business owners and homeowners still prefer analog systems because they’re cost-effective and work well with existing cables. Essential Equipment includes a DVR unit with enough channels (4, 8, 16, or 32), a surveillance-grade hard drive, analog CCTV cameras, coaxial cables (RG59/RG6) with BNC connectors, 12V DC power supplies, a monitor with HDMI/VGA connection, and an Ethernet cable for network access. Key Setup Steps: Install hard drive → Connect cameras via coax → Configure DVR settings → Set up recording modes → Enable remote viewing → Test all connections. My approach focuses on practical, field-tested methods. After installing hundreds of DVR systems, I’ve learned that proper setup prevents 90% of future problems.
What Equipment Do You Actually Need for DVR Setup?
Starting with the wrong equipment is like building a house on a shaky foundation—everything that comes after will wobble. I’ve watched countless people struggle with their DVR systems simply because they skipped the basics or went with the cheapest options available.
Your DVR unit needs to match your camera count exactly. A 4-channel DVR can’t handle 6 cameras, no matter how much you want it to. The surveillance hard drive deserves special attention here—regular computer drives aren’t built for the constant recording demands of security systems. I’ve seen standard drives fail within three months of 24/7 operation, while proper surveillance HDDs keep running for years.
| Component | Standard Option | Surveillance Grade | Typical Lifespan |
|---|---|---|---|
| Hard Drive | Desktop HDD | WD Purple/Seagate SkyHawk | 3-5 years vs 6 months |
| Cables | Generic Coaxial | RG59/RG6 with BNC | Signal quality difference |
| Power Supply | Cheap adapters | Regulated 12V units | Camera protection critical |
Coaxial cables with proper BNC connectors eliminate most video signal issues. I recommend RG6 for longer runs and RG59 for shorter distances. The power supplies need careful consideration—using the wrong voltage permanently damages cameras. A multi-channel power box simplifies installation compared to individual adapters.
For professional guidance on equipment selection, visit our technical resources or contact our installation team for personalized recommendations based on your specific setup requirements.

How Should You Plan Your DVR Location and Camera Layout?
Now that you have the right equipment, the next critical decision is where to place everything. Poor planning here causes more installation nightmares than any other factor—trust me, I’ve crawled through enough attics fixing preventable mistakes.
Your DVR needs a secure location away from public areas. A locked closet or equipment room works perfectly. The unit requires at least 3 inches of clearance on all sides for proper ventilation. Heat kills electronics faster than anything else, so avoid placing them near furnaces, water heaters, or in direct sunlight. Dust accumulation ranks as the second biggest killer—a clean environment extends your system’s lifespan significantly.
| DVR Location Factor | Good Choice | Poor Choice | Why It Matters |
|---|---|---|---|
| Temperature | Climate-controlled room | Garage/attic | Heat reduces lifespan by 50% |
| Security | Locked equipment closet | Public area | Prevents tampering/theft |
| Access | Easy reach for maintenance | Cramped corner | Simplifies troubleshooting |
For camera layout, map each position to a specific DVR channel number before drilling holes. Cover all entry points, high-value areas, and cash registers. Overlap coverage slightly to eliminate blind spots—gaps in coverage defeat the entire purpose. Plan your cable routes to avoid electrical interference from fluorescent lights and motors.
Professional installation guidance is available through our technical support resources. For complex layouts requiring custom planning, contact our installation specialists for site-specific recommendations.
What’s the Correct Way to Install Your DVR Hard Drive?
With your DVR location planned, the next critical step is installing the surveillance hard drive properly. This foundation step determines your recording reliability for years to come—mess it up now, and you’ll face constant headaches later.
Start by powering off your DVR completely and unplugging it from the wall. Remove the DVR cover by unscrewing the side or top panel. Locate the internal hard drive bay—it’s usually clearly marked and designed for 3.5-inch drives. Mount your surveillance HDD securely in the designated bay using the provided mounting screws.
| Drive Capacity | Recording Time (4 Cameras) | Best Use Case | Monthly Cost Per TB |
|---|---|---|---|
| 1TB | 1-2 weeks | Small office/home | $50-70 |
| 2TB | 2-4 weeks | Medium business | $80-120 |
| 4TB | 4-8 weeks | Large facility | $140-180 |
Connect the SATA data cable and power connector firmly—loose connections cause recording failures. Replace the cover and power on your system. Navigate to the DVR’s main menu, find Storage settings, and select Initialize. This formatting step optimizes the drive for continuous recording and prevents corruption issues.
For technical guidance on drive selection and installation procedures, visit our comprehensive installation resources. If you encounter initialization problems, contact our technical support team for troubleshooting assistance.
How Do You Connect Analog Cameras to Your DVR?
With your hard drive properly installed and initialized, it’s time to connect your analog cameras to the DVR. This step makes or breaks your video quality—I’ve seen more systems fail from poor connections than any other single issue.
Start by running RG59 or RG6 coaxial cable from each camera location to your DVR. RG6 works better for longer runs, while RG59 handles shorter distances perfectly. Attach BNC connectors to both ends of each cable—these twist-lock connections provide the most reliable signal transmission available for analog systems.
| Connection Issue | Symptoms | Fix | Prevention |
|---|---|---|---|
| Loose BNC | Static, rolling lines | Push until click/lock | Test each connection |
| Wrong polarity | Camera won’t power on | Swap red/black wires | Use multimeter test |
| Voltage drop | Dim/flickering image | Thicker wire gauge | Proper wire sizing |
Connect the camera end to the video output port and the DVR end to the corresponding channel input. Push each BNC connector until it clicks and locks securely—loose connections cause 60% of video problems I troubleshoot.
For power supply setup, install 12V DC adapters near each camera. Connect power leads carefully: red wire to positive, black to negative. Test the voltage with a multimeter if the cameras don’t power on. Use proper wire gauge for runs over 50 feet to prevent voltage drop.
For detailed wiring diagrams and connection troubleshooting guides, visit our technical resource center. Need help with complex installations? Contact our installation specialists for professional assistance.

What DVR Settings Should You Configure First?
With your cameras connected and receiving power, the next crucial step is configuring your DVR settings properly. Skip this configuration, and you’ll end up with a system that records everything poorly or misses important events entirely.
Start with the basics: set the correct date and time with your timezone. This affects everything from timestamp accuracy to scheduled recordings. Change the admin password from the factory default immediately—leaving “admin/123456” is like leaving your front door wide open. Label each channel input to match your camera locations for easier navigation.
| Recording Mode | Storage Usage | Best Application | Recording Hours (1TB) |
|---|---|---|---|
| Continuous 24/7 | 100% capacity | High-security areas | 168-240 hours |
| Motion Detection | 40% capacity | Most business uses | 420-600 hours |
| Scheduled Only | Variable usage | Business hours only | 672+ hours |
Motion detection configuration deserves special attention—proper settings reduce storage usage by 60%. Adjust sensitivity levels for each camera location and set detection areas to ignore moving trees, flags, or busy roads. These prevent false triggers that fill your storage with useless footage.
For detailed configuration guides and troubleshooting support, check our technical documentation. Need help optimizing settings for your specific environment? Contact our configuration specialists for personalized assistance.

How Can You Set Up Remote Viewing Access?
With your DVR settings optimized, the next logical step is setting up remote viewing access. This capability transforms your security system from a local-only solution into a powerful monitoring tool you can access from anywhere—though it requires careful network configuration to work properly.
Start by connecting your DVR to your router using an Ethernet cable. Access the network settings in your DVR menu and configure either a static IP address or enable DHCP for automatic assignment. Set your gateway and DNS server addresses correctly—incorrect settings here cause 70% of remote access failures I troubleshoot.
| Remote Access Method | Security Level | Setup Difficulty | Best Use Case |
|---|---|---|---|
| P2P/Cloud Service | Good | Easy (QR scan) | Home users |
| Port Forwarding | Medium | Moderate | Small business |
| VPN Access | High | Complex | Business/enterprise |
| DDNS Service | Medium | Moderate | Dynamic IP situations |
Security considerations are absolutely critical—I’ve seen too many systems compromised by weak remote access setup. Use strong passwords and enable two-factor authentication wherever possible. P2P services offer excellent security while remaining user-friendly, allowing simple QR code scanning for mobile app setup.
For detailed remote access configuration guides and security best practices, visit our comprehensive setup resources. Need assistance with complex network configurations? Contact our network specialists for professional remote access setup.
Conclusions
Setting up a DVR system for analog cameras requires attention to detail but delivers reliable security coverage. Focus on proper equipment selection, secure connections, and thoughtful configuration. With these fundamentals in place, your system will provide years of dependable service. The key is following each step methodically, from equipment selection through remote access setup, ensuring your analog camera system operates at peak performance.
