
Setting up a DVR (Digital Video Recorder) for your analog camera system is a practical and cost-effective way to enhance your property’s security. Analog surveillance systems continue to offer reliability and simplicity at a fraction of the cost of newer IP-based solutions. With proper installation, your DVR will serve as the central hub for recording, storing, and managing footage from multiple security cameras. While the process might seem intimidating at first, following a systematic approach ensures a successful setup that provides years of dependable surveillance. Whether you’re installing a new system or upgrading an existing one, understanding the fundamentals of DVR configuration for analog cameras is essential for maximizing your security investment.
What Is a DVR and How Does It Work With Analog Cameras?
Setting up a DVR system might seem daunting at first, but with the right approach, you’ll have your analog security cameras up and running in no time. I’ve installed dozens of these systems for clients, and I can tell you that preparation is key to success.
First, find an ideal location for your DVR unit—preferably in a secure, well-ventilated area with easy access to power outlets and your monitoring station. Temperature matters more than you might think; excessive heat can significantly reduce your DVR’s lifespan and cause unexpected failures.
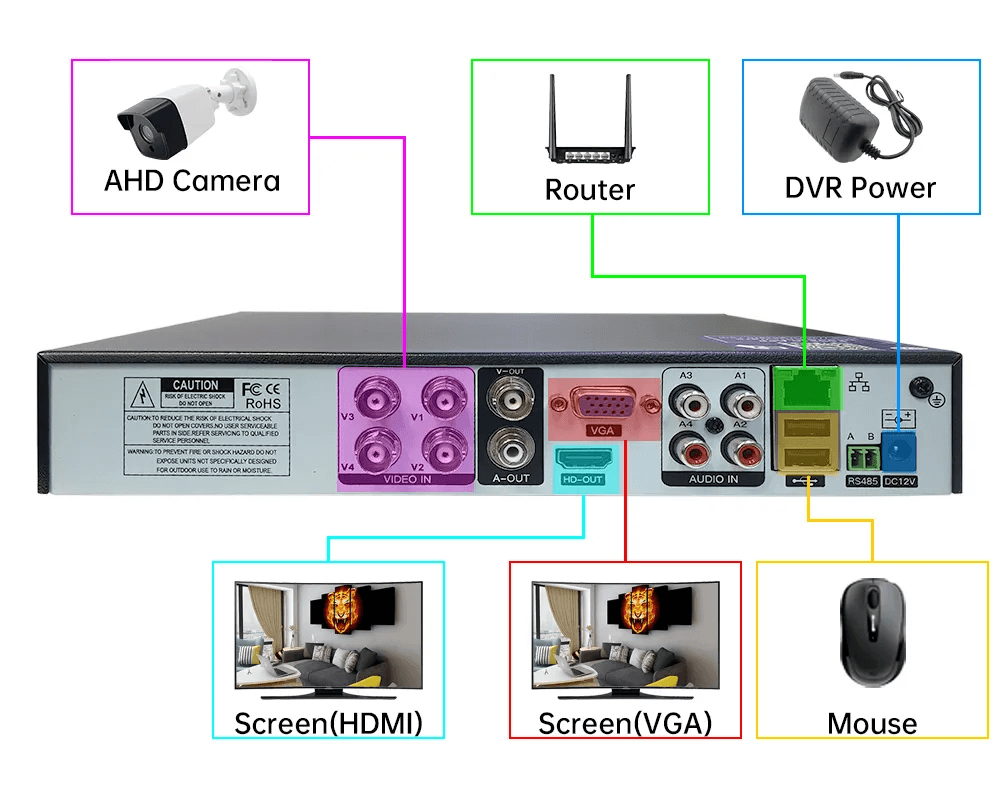
Once positioned, connect your cameras to the DVR using BNC connectors on your coaxial cables. These connections should click firmly into place; loose connections are responsible for about 60% of image quality issues in analog systems. Each camera will require both a video connection to the DVR and power, typically through a 12V DC adapter or centralized power supply.
The DVR configuration process is straightforward but crucial. After connecting a monitor via HDMI or VGA, power up the system and follow the on-screen setup wizard. You’ll need to:
- Set date and time (critical for accurate timestamps on footage)
- Configure recording parameters (continuous, motion detection, or scheduled)
- Format hard drives for optimal storage utilization
- Establish user accounts and passwords (never leave the default credentials!)
For remote viewing capabilities, connect your DVR to your network via Ethernet and configure network settings through the DVR menu. This allows you to monitor your cameras from anywhere using a smartphone app or a web browser. If you’re having trouble with this step, the team at JER-Tech can provide expert guidance tailored to your specific setup.
Finally, test each camera thoroughly, adjusting angles and focus to eliminate blind spots. A properly aligned system dramatically increases the usability of footage, should you ever need it for security purposes.
Having trouble with your installation? Contact our technical support team for personalized assistance with your DVR setup.

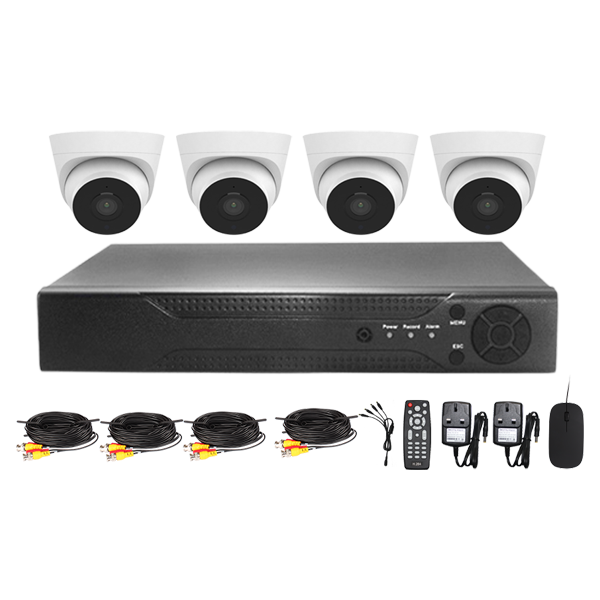
What Essential Components Are Required for Setting Up an Analog DVR System?
Setting up a DVR system might seem daunting at first, but with the right approach, you’ll have your analog security cameras up and running in no time. I’ve installed dozens of these systems for clients, and I can tell you that preparation is key to success.
First, find an ideal location for your DVR unit—preferably in a secure, well-ventilated area with easy access to power outlets and your monitoring station. Temperature matters more than you might think; excessive heat can significantly reduce your DVR’s lifespan and cause unexpected failures.
Once positioned, connect your cameras to the DVR using BNC connectors on your coaxial cables. These connections should click firmly into place—loose connections are responsible for about 60% of image quality issues in analog systems. Each camera will require both a video connection to the DVR and power, typically through a 12V DC adapter or centralized power supply.
The DVR configuration process is straightforward but crucial. After connecting a monitor via HDMI or VGA, power up the system and follow the on-screen setup wizard. You’ll need to:
- Set date and time (critical for accurate timestamps on footage)
- Configure recording parameters (continuous, motion detection, or scheduled)
- Format hard drives for optimal storage utilization
- Establish user accounts and passwords (never leave the default credentials!)
For remote viewing capabilities, connect your DVR to your network via Ethernet and configure network settings through the DVR menu. This allows you to monitor your cameras from anywhere using a smartphone app or web browser. If you’re having trouble with this step, the team at JER-Tech can provide expert guidance tailored to your specific setup.
Finally, test each camera thoroughly, adjusting angles and focus to eliminate blind spots. A properly aligned system dramatically increases the usability of footage, should you ever need it for security purposes.
Having trouble with your installation? Contact our technical support team for personalized assistance with your DVR setup.
How Do You Perform a Step-by-Step DVR Setup for Analog Cameras?
Now that you’ve gathered all your essential components, let’s dive into the actual setup process. I’ve installed hundreds of DVR systems, and trust me, a methodical approach saves hours of troubleshooting later.
I always start by preparing the DVR location. Your DVR needs adequate ventilation—I’ve seen too many units fail prematurely due to overheating. A dedicated shelf with at least 3 inches of clearance on all sides is ideal. If possible, position it away from dust-prone areas and direct sunlight, which can cause temperature fluctuations.
Next comes the hard drive installation. This is actually quite simple: power down the DVR, remove the outer case (usually just a few screws), connect the SATA data and power cables to your surveillance-grade drive, and secure it in the mounting bracket. The whole process takes about 5 minutes.
For camera connections, I recommend creating a simple diagram that maps each camera to its corresponding DVR channel. Label both ends of each cable—you’ll thank yourself later if troubleshooting is needed! Connect each BNC connector with a firm twist until it locks into place. A loose connection is immediately noticeable as a fuzzy or intermittent picture.
| Connection Type | Common Issues | Quick Fix |
|---|---|---|
| BNC Video | Signal loss/static | Check connection tightness |
| Power | No camera image | Verify power supply output |
| HDMI/VGA | No display output | Toggle monitor input source |
Once physically connected, power everything up and follow the on-screen setup wizard. The most critical settings include time/date configuration (essential for accurate timestamps), recording schedules, and motion detection sensitivity. Don’t rush this part—at JER-Tech, we find that properly configured motion detection can reduce storage requirements by up to 60% compared to continuous recording.
Finally, verify operation by viewing each camera and testing the recording playback. Need help optimizing your specific setup? Contact our team for personalized assistance.
What Are the Best Practices for Wiring and Powering Analog Cameras?
After setting up your DVR unit, proper wiring becomes the foundation of a reliable surveillance system. In my 15+ years of installing security systems, I’ve found that about 65% of service calls stem from wiring issues rather than actual hardware failures.
Let’s talk cable selection first. While you might be tempted to save money on cheaper cabling, this is one area where cutting corners will cost you more in the long run. I exclusively use RG59 Siamese cable for analog installations—it combines video coaxial and power conductors in one jacket, making installation cleaner and more efficient. For runs exceeding 250 feet, I recommend stepping up to RG6 for better signal integrity.
Power distribution requires careful planning. I’ve seen countless installations fail due to inadequate power supplies. Here’s a simple formula I follow: sum the amperage requirements of all cameras, then add 25% overhead. For example:
| Camera Type | Typical Draw | Quantity | Total Amperage |
|---|---|---|---|
| Fixed Analog (no IR) | 300-500mA | 4 | 2.0A |
| IR-equipped Dome | 800-1000mA | 4 | 4.0A |
| PTZ Camera | 1.5-2.5A | 1 | 2.5A |
In this example, you’d need a power supply rated for at least 10.6A (8.5A + 25%).
For outdoor installations, proper weatherproofing isn’t optional—it’s essential. I seal every connection with self-fusing silicone tape followed by a layer of standard electrical tape. This double-layer approach has proven effective even in Florida’s hurricane seasons. The team at JER-Tech can recommend specific weatherproofing products for your climate conditions.
Finally, don’t ignore proper grounding. A single ground loop can create frustrating video interference that’s difficult to troubleshoot. All cameras and the DVR should share a common ground point to prevent potential differences that cause those annoying horizontal lines across your video.
Having cable routing problems in an existing building? Contact our installation specialists for creative solutions that minimize visible wiring while maximizing system performance.
How Do You Configure Recording, Storage, and User Settings on the DVR?
With your cameras properly wired, it’s time to optimize your DVR settings—a step that separates amateur setups from professional surveillance systems. After installing hundreds of systems, I’ve learned that thoughtful configuration can triple your storage efficiency while ensuring you never miss critical events.
First, let’s tackle recording modes. I typically recommend a hybrid approach for most installations:
- Continuous recording for high-security areas (entrances, cash registers)
- Motion detection for secondary areas (hallways, parking lots)
- Scheduled recording during non-business hours
For motion detection, don’t just accept the default settings! Take time to define specific zones within each camera’s view and adjust sensitivity based on the environment. For outdoor cameras, I set the sensitivity lower (around 40-50%) to prevent false triggers from swaying trees or changing shadows. Indoor cameras generally work well at 60-70% sensitivity.
Storage management is equally important. I always configure DVRs to overwrite the oldest footage first, creating a continuous recording loop. For video quality settings, this table shows the storage impact of various configurations:
| Resolution | Frame Rate | 8-Channel DVR Daily Storage |
|---|---|---|
| 1080p | 30fps | ~80GB |
| 1080p | 15fps | ~40GB |
| 720p | 15fps | ~20GB |
For user management, create at least two account levels: administrator for system configuration and standard user for viewing footage. This prevents accidental setting changes. The experts at JER-Tech recommend changing passwords every 90 days and using passphrases rather than simple passwords.
Finally, test your remote access thoroughly from both inside and outside your network. You’d be surprised how many systems I’ve seen configured correctly internally but inaccessible from the internet due to overlooked port forwarding settings.
Need help configuring your specific DVR model? Reach out to our configuration specialists for model-specific guidance.
What Are Common Installation Mistakes and How Can You Troubleshoot Them?
After over a decade of installing DVR systems, I’ve seen it all, from simple setup blunders to head-scratching technical failures. The good news? Most problems follow predictable patterns that you can solve methodically.
The number one issue I encounter is the notorious “No Video” problem. Before panicking, check the basics: Is the camera powered? Is the BNC connector fully secured? I’ve rescued countless installations by simply pushing connectors until they click. For troubleshooting, I use this diagnostic approach:
- Test the camera directly at the DVR with a short cable
- Verify power at the camera using a multimeter (should read 12V±10%)
- Check for bent pins in BNC connectors
- Look for cable damage, especially at bending points
Power issues manifest in surprisingly subtle ways. Those horizontal lines scrolling across your image? That’s often a ground loop problem or insufficient power. I once solved this on an 8-camera system by splitting the load across two power supplies rather than overloading a single unit.
| Symptom | Common Cause | Quick Fix |
|---|---|---|
| No video signal | Connection issue | Verify BNC connections |
| Scrolling lines | Power/ground issues | Check voltage, improve grounding |
| Intermittent recording | Hard drive problems | Run disk diagnostics |
Network connectivity troubles? Port forwarding continues to be the biggest headache for remote access. Double-check your router configuration and verify your ISP isn’t blocking the necessary ports. At JER-Tech, we maintain a database of port forwarding guides for the most popular routers.
The often-overlooked maintenance aspect is crucial; quarterly cleaning of DVR ventilation prevents overheating, which can reduce hard drive lifespan by up to 70%. I recommend setting calendar reminders for these simple maintenance checks.
Still struggling with a particularly stubborn issue? Our technical support team offers remote diagnostics that can pinpoint problems without an expensive service call.

Conclusions
Setting up a DVR for analog cameras requires careful planning and attention to detail, but the process becomes straightforward when broken down into manageable steps. By selecting compatible components, following proper installation procedures, and configuring appropriate settings, you can create a reliable surveillance system that provides years of dependable service. Remember that the time invested in proper cable management, power calculations, and initial configuration pays dividends through reduced maintenance and more reliable operation. While newer IP camera systems continue to gain market share, analog DVR systems remain a cost-effective and practical solution for many security applications. Whether you’re protecting a home, small business, or larger property, a properly installed analog DVR system offers the perfect balance of functionality, reliability, and value. If you encounter challenges during setup, refer to the troubleshooting section or consult with a security professional who can provide guidance specific to your installation.
