Are you planning to set up a surveillance system for your home or office? Configuring an NVR (Network Video Recorder) for IP cameras on a network can be a daunting task, especially if you are not familiar with the technicalities involved. In this article, we will guide you through the process of configuring an NVR for IP cameras on a network, step by step.
What is an NVR?
A Network Video Recorder (NVR) is a system that features a software application designed to collect and store videos captured by cameras connected to the network. Unlike other storage devices, it has no specific video capture hardware, and the software is operated on a dedicated device. NVRs are typically used in IP video surveillance systems and are capable of streaming video/audio data on a single cable.
A Brief Introduction to NVR Setup
NVR can be set up with or without a Power over Ethernet (PoE) or Non-PoE switch. PoE switches are used with PoE-compatible cameras, while Non-PoE models feature no ports for plugging in cameras. However, they do feature an inbuilt scan function that can scan for cameras on the same network.
How to Configure NVR for IP Camera with PoE Switch?
Hardware Setup for NVR and PoE Switch
Before we get to the software setup, let’s first focus on the hardware setup. Here are the steps you need to follow:
Step 1: Connect the NVR to the Internet
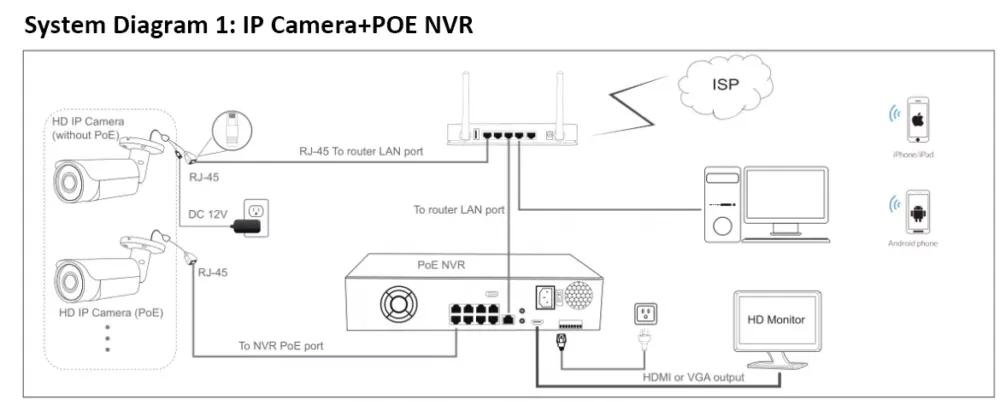
The first thing you need to do is to connect the NVR to the Internet. To do this, take an Ethernet cable from the router and connect it to the back of the NVR.
Step 2: Connect the IP Cameras to the PoE NVR
Next, you’ll need to connect the IP cameras to the PoE NVR. To do this, use Ethernet cables to connect the cameras to the PoE ports on the NVR. As the NVR is enabled with PoE technology, it can easily power the IP cameras.
Step 3: Connect the NVR to the TV or Monitor
Finally, you’ll need to connect the NVR to a TV or monitor using an HDMI or VGA cable. Make sure to use the right input to connect the TV or monitor—HDMI 1, HDMI 2, or VGA.

Software Setup for NVR and IP Camera Connection
Once you’ve completed the hardware setup, the next step is to configure the software. This can be easily done by following the instruction manual provided by the manufacturer. Here are some tips to help you get started:
Step 1: Log in to the NVR
To access the NVR’s settings, you’ll need to log in using a username and password. The default username and password are usually provided in the manual, but it’s recommended to change them for security reasons.
Step 2: Add the IP Cameras to the NVR
Once you’re logged in, you’ll need to add the IP cameras to the NVR. To do this, go to the camera settings and click on “Add Camera.” Enter the camera’s IP address and login credentials, and the NVR should automatically detect and add the camera.
Step 3: Configure the Recording Settings
Now that you’ve added the cameras, you’ll need to configure the recording settings. This includes setting the recording schedule, motion detection, and other options.
Step 4: View the Cameras on the TV or Monitor
Finally, you can view the cameras on the TV or monitor connected to the NVR. Simply select the camera feed you want to view, and it should appear on the screen. Setting up an IP surveillance system with an NVR and PoE switch may seem daunting at first, but it’s actually quite simple once you know the steps.

How to Configure NVR for IP Camera without PoE Switch?
As discussed before, NVR without a PoE switch has no Ethernet ports at its back panel. It utilizes an external power adapter or an external PoE switch to power each IP camera. Like NVR with a PoE switch, the configuration of NVR for an IP camera without a POE switch also begins with the hardware configuration. Here’s how to proceed:
Hardware Configuration
Before you start configuring your NVR, you need to set up the hardware properly. Here’s how:
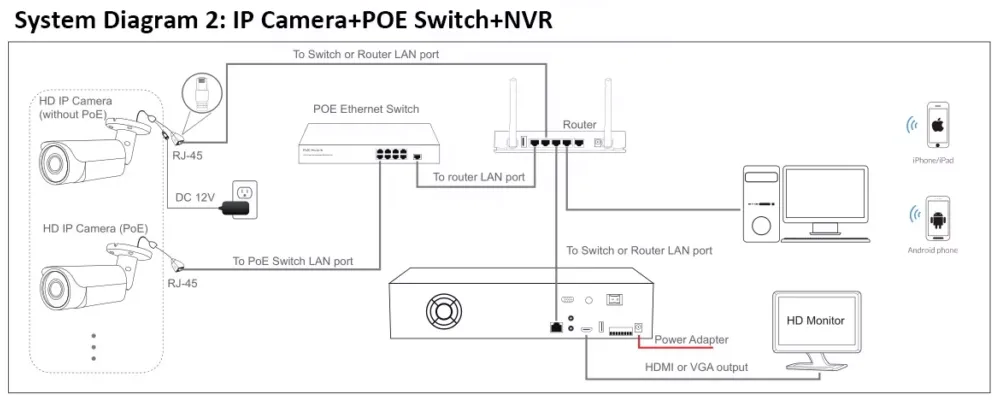
Step 1: Connect the LAN port on the external PoE switch and the router using an Ethernet cable.
Step 2: Connect the router with the non-PoE NVR using another Ethernet cable.
Step 3: Use Ethernet cables to connect all your IP cameras to the PoE switch RJ45 ports. The PoE switch will deliver power to each camera and support video transmission.
Step 4: Use an HDMI cable or VGA cable to connect the monitor and the NVR. Always use the right input for making the connection.
The software setup for connecting the NVR and the network camera is the same as using a POE switch

Why NVR must be connected to the Internet?
Connecting your NVR to the Internet provides easy remote access to the recordings. It sends alerts or notifications to users regularly and creates backups of the videos on cloud storage solutions. In the absence of the Internet, NVR will record and stream the videos, but they will not be remotely accessible to users.
What is the maximum transmission distance of the camera from the NVR?
The maximum transmission distance of the Ethernet cable connecting the NVR and an IP camera is 100 meters. This distance is limited due to the attenuation of signals. The Ethernet extender is used to extend the transmission distance beyond 100 meters.
Compatibility and Quality of PoE Switches
In addition to all the steps and points covered in the post, it’s always important to check the compatibility of your NVR with the IP cameras on the network. Also, ensure that your NVR supports the camera resolutions because many of them cannot support 12MP or 4K security cameras. Along with these, it’s also important to use quality PoE switches for the connection. Versitron provides PoE media converters and switches in different configurations.

Conclusion
Configuring an NVR for IP cameras on a network can be a challenging task, but by following the steps mentioned above, you can set up a surveillance system in no time. Remember to configure the recording settings based on your requirements and available storage space. Also, make sure to configure the remote access settings to access the video footage remotely.
FAQs
Q1. Can I use Wi-Fi cameras with an NVR?
A1. Yes, you can use Wi-Fi cameras with an NVR, but it is recommended to use wired cameras for better stability and performance.
Q2. Can I add more cameras to the NVR later?
A2. Yes, you can add more cameras to the NVR later, provided they are compatible with the system.
Q3. How much storage space do I need for recording the video footage?
A3. The amount of storage space required depends on the recording settings, such as the resolution, frame rate, compression format, and the number of cameras. It is recommended to use an NVR with a minimum of 1TB of storage space for recording video footage.
Q4. Can I access the NVR remotely without a static IP address?
A4. Yes, you can access the NVR remotely without a static IP address by using a dynamic DNS service that maps a domain name to your NVR’s IP address.
Q5. Can I view the video footage on multiple devices simultaneously?
A5. Yes, you can view the video footage on multiple devices simultaneously by configuring the remote access settings on the NVR and using compatible viewing software on each device.


